Monday, June 25, 2012

Pre-Service Teaching Institute

Unfortunately, as delayed as I am, my 365 Days of Teaching project will have to be delayed even more.

But it's for a good reason.

A great one actually.

I'm currently in Houston, Texas at the Johnson Space Center.  I'm spending the week here doing a pre-service teaching institute, which is pretty much like a boot camp for pre-service teachers which specializes in science, technology, math, and engineering.

BUT... what do you think I'm doing while I'm here?

BLOGGING!

In Girl Scouts, I learned this song,

"Make new friends, but keep the old, one is silver and the other's gold"

Well, I'm thinking that I'll adapt that...

"Make new blogs, but keep the old, one is silver and the other's gold"

I feel like I'm just collecting blogs here.  But I just couldn't resist passing up sharing this information.  You wouldn't believe all the cool things I learned I could do in the classroom today.

Did you know that a cent sign isn't real? It's made up! You aren't even supposed to use it in teaching!!

Did you know NASA will set up meetings to do a video chat with your class on different STEM (Science, Technology, Engineering, Mathematics) topics?

Do you know what will happen if you do the mentos and coke experiment so far under water that the pressure is 2.5 times that of ground level?

Do you know how to keep kids on-task on the computer, doing only the tasks you lay out for them to do?

Do you know how to incorporate dominoes into the classroom?

Go to my blog, Pre-Service Teaching Institute Experience, to find out the answers to all these questions, plus a million more you never knew you had.  


This experience is a great one for me, and I think all teachers should have it.  Unfortunately, I know that's not possible so I'm trying to at least share this info.  And it's a LOT of information.

First day is just ending and I'm already 7 posts in.

PLEASE, if you're a teacher, look at this information. It's amazing.  Let me know what you think.

Back to crafting soon,

Amy

Friday, June 22, 2012

Day 31: Camp Scavenger Hunt

For day 31, I was supposed to make a path for someone to follow.

To connect this to school/camp, I made a scavenger hunt (which I had wanted to do for awhile) for the campers to complete.

I came up with 10 clues for them to follow outside.

Some of the clues included:

Elephants aren't the only things with trunks... turn left.

Don't ignore the warning signs.

Don't beat around the bush, bat around the pole.

and my personal favorite:


1...2...3...4...5...6...7...     +    Giving someone something for money    +    what you paddle a canoe with (used a picture here)


Can you figure out these clues?  The scavenger hunt leads them to a pretend treasure chest full of pirate treasure (leftover from my mom's class' pirate party) that is made from a strawberry container.


I haven't been able to try this out yet, but I can't wait to! I'll update of course.

Enjoy!


Amy

Day 30: Behavior Blvd Behavior Chart

Good evening.

Let me draw your attention to the huge banner to the left.

Not that you could miss it.

I recently created this banner because of the pride I wish to share in the projects that I create that are completely original.  I always TRY to make projects that are original, but many times I end up 'surrendering' and referring to pinterest instead.

Pinterest is great, I love it, but I just love my original ideas better.

So I am extremely proud of this idea, because it is... ORIGINAL.

So the challenge for the day was to make something using a toy.

I devoted time to just think about toys that are out there and what I could do with them to create something that is useful in the classroom.  For some reason (no, I don't remember the thought train) I began thinking about toy cars (e.g. Hot Wheels) and this idea really just popped into my head.

After the idea, I really had to work out details and figure out the exact idea I had in mind, as well as things that will make it most friendly for the classroom.

I worked really hard on coming up with this, and I think it truly deserves a banner in the corner.

Now, I've started the actual poster, but I still have quite a bit of laminating and gluing to do before it is complete, so I've done a quick paint sketch to show you what it looks like.

When I am done, I will post pictures and explain the idea more in-depth.


To summarize, the students move toy cars up or down the road depending on the behavior that they are showing for that day.

More to come!

Amy

Day 29: Angry Bird Masks

The challenge of the day was to make a disguise.

This would be a perfect and easy challenge if I were teaching pre-k (think of all the dress-up options!), but I'm not. So I had to make a disguise that would be useful in a classroom.  Hmmm.

Browsing pinterest, I came across an Angry Bird Mask on Gadgetsin.com that was sold on etsy for $12 each.

Here it comes... "I can make that!!!"

So I made a set of angry birds masks (6 altogether) by sewing felt together and using elastic string to hold them to the head.


I brought them to camp to test them out... the kids loved them!!


We attempted to make a game out of it where the birds have to chase the pigs, but I can't say it went perfectly.  It's a good idea though!


These masks took about 30-40 minutes each to make (wow...) but were pretty easy (cutting, hot-gluing, sewing).

This also inspired me to make an owl sleep mask I've had my eye on for awhile... but you'll have to go to http://toomanycraftstoolittletime.blogspot.com/ to read about that.

There's one or two more birds I have left to make, plus I could make a bunch more pigs if I were to do this with a big group.  This would be a fun game to play out on the playground or at P.E.
Or just for kids to put on and be silly in.  Who knows what games they can make up themselves!

Enjoy,

Amy

Sunday, June 17, 2012

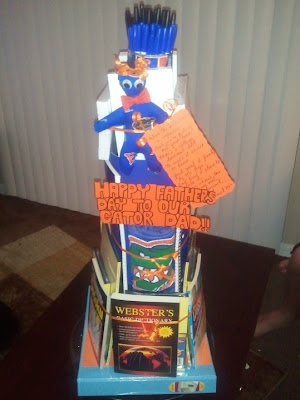
Day 28: Gator School Supply Cake

Challenge of the day: Use school materials to make something non-traditional.

I love when things just fall into place and align.

Father's day was coming up soon and my brother and I were discussing some gift options.  As usual, I had no idea where to start.  My brother was the genius who suggested doing something school-supply themed to correspond with my dad recently decided to go back to school to get his master's degree and getting accepted to UF.

Ok, so I wanted to do something original (I made my supervising teacher a school supply cake at the end of my internship... see that one here) but couldn't think of much else and was coming down to the final days.  So I decided I would do a school supply cake, but give it a gator theme with orange and blue materials.

Problem: Apparently school supplies just don't come in orange.

So it was mostly blue with some orange ribbon.

I also included a gator tshirt and a college dammit doll (adorable), which you can read about at my other blog, Too Many Crafts Too Little Time.

I started brainstorming all the things I could make a cake for... the themes and possibilities are endless!!!

Do you have any ideas?

Let me know!

Amy

Day 27: Independence Day Shaker

I know, I know, I'm still trying to catch up.  I'm getting there though!!

On day 27 I was supposed to make something inspired by a recent dream.  Usually I would have an extremely difficult time with this, but I had just happened to have the most perfect dream to fit this.

You see, I have to be the perfect teacher because I have this perfect teacher superpower that allows me to lesson plan in my sleep.

I'm serious. This isn't the first time this has happened.

So at camp, we have been collecting recyclable items to use for arts and crafts.  The camp director really wanted us to do something with milk jugs since his family goes through so much milk.  Being the arts and crafts coordinator (!), I said, "Sure, bring them in!".  So everyone started bringing in their empty milk jugs.  Months passed. Camp started. We had a room filled with milk jugs and still no ideas of what to do with them. "We could always build a milk jug igloo," I said, "But I don't know what we'll do with it."

Then I had a dream.  I had a dream that we used the milk jugs to make noise makers for the 4th of July.  It was perfect.  So I got to try it out for this project.

Since I hadn't recently finished a jug of milk, was impatient, and not willing to dump that sweet succulent liquid down the drain, I used a gallon jug of vinegar that we had just finished (the ultimate use was cleaning someone's pee off the carpet... not sure if it was the roommate's or the dog's yet).
I filled the jug with unpopped popcorn, but coins/rice/beads/etc could be used.  I then decorated it with red, white, and blue paper (making a flag), added a sign, added red white and blue paint dots with fabric paint, and tied on some ribbon for the finishing touches.


This is a great way to let students use their creativity and it would be interesting to just lay out the materials and see how they decorate their own shakers.

Ahhh, it's so refreshing to complete an original and pinterest-free project!!

Enjoy and make some noise!

Amy

Ps. Go back and check out my green accordion scrapbook from a few days ago!!! I finished it for father's day and updated the post!

Day 26: DIY Upcycled Sandwich Container

For day 26, I was supposed to make something portable that normally isn't.  This one took awhile to figure out.  I was thinking I would make a bag out of something like a tshirt, but realized a tshirt was portable.  I really couldn't think of anything that wasn't portable that I could make a bag out of (a shirt, fabric, other bags, jeans, a book).

I had to scour pinterest and landed on one of the first pins I ever pinned on my crafts board: This milk jug lunch box from lifehacker.com.


It's a very easy project and a good substitute for putting a sandwich in a plastic baggie every day (does using multiple baggies a day drive you crazy too? I feel like it's such a waste!!)

To make this, you just follow the guidelines on the website (very easy), cut along them, and fold.  It says to use a button snap to hold it together (which had been keeping me from trying it before... I didn't know how to do this and was scared to try) but I just used a velcro dot instead with superglue.

On a related note... I made Logan and I egg salad sandwiches to take to work one day.  I put mine in the pink re-usable sandwich container I had (store-bought, not this kind) and was nice enough to give Logan the blue and green one.  I didn't think much of it, I thought I was being nice.
Apparently a 20-something should NOT be bringing a 'little boy' re-usable sandwich container into work and he was ridiculed endlessly all day.
I guess teachers can get away with these kinds of things.
After I made this and showed it to him, Logan actually said, 'Hey! Something they won't make fun of me for!!'
Yeah, we'll see.

Try this out if you bring a sandwich to work often!

Enjoy!


Amy

Friday, June 15, 2012

Day 25: Nature Suncatcher AND Nature Pictures

For day 25, I was supposed to work to nature.  I actually completed two projects on this day and incorporated both of them into camp.

The first and original project I worked with was a nature suncatcher from familyfun.  You pretty much collect a bunch of things from nature and iron them in between two pieces of contact paper, then cut it out to make a sun catcher/ window hanging.

I didn't have any con-tact paper, so I wanted to use wax paper.  I quickly tried it before camp and it worked nicely (not as well as it should, I'm sure, but it worked).

Then at camp I tried it with my kids.  The iron wasn't as good and it didn't work as well, but the kids still enjoyed it.  I had kids in grades 1-5 in my group that day, and they all truly enjoyed walking around outside and collecting nature, then doing something with it.

On our first attempt, I couldn't find an iron so I had to come up with something to do with all these leaves they had just collected.  I grabbed some paper, glue, and crayons and challenged the kids to be as creative as they could with their nature and make a picture.
Some of the pictures were amazing (I only got a picture of mine) and very creative!! What a great way for students to really use their critically thinking skills in the classroom!


Ps, mine is a picture of a boy giving a girl a flower under an umbrella in the rain.  I ended up sharing the majority of my natural findings with kids who picked up rocks and pine cones only to find they wouldn't stick to paper, but you can see the leaf, the flower, and the moss in her hair!

Enjoy!

Amy

Day 24: Green Accordion Scrapbook

On day 24, the challenge was to work only with green colored materials.  This actually left a lot of options open because practically anything can be made using green.  I searched around my house for green materials and ended up making this accordion scrapbook album .


This was very very easy and the instructions were easy to remember.  I was even able to make another one for a camper the next day in about 10 minutes.  This one I was planning on using for Father's Day... I will definitely post when I have some pictures!!!

This can be used for countless things in the classroom including book reports, state projects, alphabet books, student/parent presents, or classroom photo album.

This is one of my favorite projects that I have done with the 365 book. TRY IT!!!

Enjoy.

Amy


UPDATE: 6/17/12


I finished the father's day book last night and it was a big hit today! I just added pictures of my dad and I throughout the years and some quotes as well.  I love how it turned out.  


Check out the other father's day gifts I made for him on the rest of my blog!!

Day 23: Snack Container

For day 23, I was supposed to make something using the things from the recycle bin.

I found this funny because I feel like everything I have been making has been from the recycle bin, such as the I-Spy Water Toy, Garage Toy Box, and Beer Bottle Drinking Glasses.

Oh well, a few more won't hurt.

So this day, I did a simple project that I saw on pinterest.  The idea was to take an empty coffee-mate container and put snacks in it.

I decided to use it as a rice holder, but it would be good in a primary classroom for snacks for little hands.

A very easy project!!! Will definitely make some more!


Amy

Sunday, June 10, 2012

Day 22: Penny Bridge

The challenge of the day was to create a bridge.  It could be small or it could be big.  I was lost for creative ideas and it was already 10:00pm, so I googled 'Make a bridge' and found the instructions for a...

A penny bridge!! It looked pretty awesome and I just happened to have a whole bucket of pennies sitting in my room so I tried it out.

It was extremely mentally stimulating and a fun thing to create... it was like a really difficult game of Jenga.  Mine only fell over once in the first few minutes, but I finally got it looking like this!


This would be a fun activity to do with older kids, maybe to see how big you can get it or who can make their bridge first.  It takes a lot of concentration and a steady hand, so it wouldn't be great for little kids.

Try it out! Let me know how you did!

Amy

Day 21: Ten Word Love Story


This had to have been one of my favorite challenges.

I was supposed to write a ten-word love story.  For a bonus, I could illustrate it.

I love writing, and I dabble in doodling, so within an hour I had come up with something I was very proud of.  Here it is!!!


I think this challenge itself would be a great classroom activity for students in middle or high school.  It allows them to be creative and really push their limits for 'story writing'.

Enjoy!

Amy

Day 20: Clay Pendants

On day 20, I was supposed to make or buy clay to use in my project.  I decided to make clay using a recipe found on pinterest (2 cups flour, 1 cup salt, cold water, bake at 250 degrees for 2 hours).

My intention was to make a thumb print pendant, but the homemade clay was a little sticky and wouldn't show a thumbprint.  Instead, I just made big beads and hearts.  I stuck them in the oven.  They still have another 15 minutes to bake and when they're done I have to paint the ones I choose to keep.

I also had a plan to use these pendants in camp this year during boot camp week to make dog tags for all the kids, but I tried writing on one and it wasn't that easy to write on.  We'll have to see about that...

I'll post an update when I'm done with them!!

Enjoy!


Amy

Saturday, June 9, 2012

Day 19: I Spy Water Toy

The challenge of the day was to create something that floated on water.

I am actually very excited about what I came up with.

Inspired by the water toys for toddlers in Pink Pistachio's Blog, I created an I-Spy toy for older kids (ages 5-8).  The kids have to be able to read to participate in this activity individually.


To do this, I added 20 random things found around the house to a filled water bottle, threw in some glitter, super-glued the lid shut, and taped a list to the outside.

The object of the toy is for the children to spy all 20 items listed on the list.

It's an interesting way to discuss and predict whether and why some things float and some things sink, and a great way to keep kids busy for 10-20 minutes.

Some of the things I included in my bottle were: a penny, a nickel, a dime, a die, a game piece, a paper clip, a safety pin, a bobby pin, a push pin, a sewing pin, a crayon, etc.

The ironic thing about it all... I found the water bottle in my car (see yesterday's project).

I'm excited to try this out at camp and see how they like it!

Enjoy,


Amy

Day 18: Garage Toy Box

I'm still working on catching up on my 365 classroom projects!!  I took care of a big chunk of them today.

For day 18, I was supposed to use the things I found in my car to create something.  Unfortunately, I had recently cleaned out my car and didn't have much to work with.  Plus, I was really in a mood to do something productive and useful, not just make anything.

So I went to the next best thing... my garage.

This is what my garage shelf looks like since Logan's moved in and we're using the boxes to move things:


I needed to use those items in some way, so I decided to ORGANIZE THEM and make a storage box from a rice cooker box that moved in with the boyfriend.  This project is inspired by Mandy's Krafty Exploits and the storage bin she made out of diaper boxes.  The length and depth of that project made me exhausted just imagining it, so I'm making a... shortcut version.

I started this project by cutting off the flaps of the box and spray painting it black.  Tomorrow, when it's dry, I will add a rim of fabric around the top and a label, and be done!!!

I will post a picture when it is complete.


Oh, before I forget!!! I also made something nifty out of what was in my recycling bin:


You'll have to read my other blog, Too Many Crafts Too Little Time to find out what it is though!!!

Check back tomorrow for a toy box update and picture.

Enjoy!


UPDATE: 6/16/12

Here is what the finished  box looks like. I'm actually very pleased with it! I didn't end up labeling it because it's really just 'junk' or small things in the garage.


 Before


                                                              After


Amy

Day 17: Celebration Glasses!

The challenge for day 17 was to make something inspired by or that goes over an eye.

I was ready to take the easy way out and make a quick pirate eyepatch that would go with a pirate costume later on.

But then I thought further about it and decided to put some effort into it, and came up with something original.

That's right, folks, this is a PINTEREST-FREE PROJECT!!!!

I decided to make fun paper glasses that students could use and decorate for any occasion.  To do this, I found a template online at firstpalette.  I used the template so that I would get the sizes and proportions right for little faces.

I printed out the template, cut it out, and traced it onto cardstock.  I then altered the glasses so that they would have a big space that covers the forehead to write on or decorate.

I know kids love wearing silly glasses and getting the attention from them.  The great thing about this template is that you can just trace it onto another piece of cardboard or cardstock and decorate it to celebrate anything (birthday, holiday, student of the week, etc).


I'm definitely trying this at camp this summer and will post pictures to show you how they turn out!

Enjoy!

Amy

Day 16: Potato Stamps

The challenge for day 16 was to make a unique print by making a stamp out of a potato or a sponge.

To relate this to the classroom, I thought it would be a fun idea for students to make their own stamps and create an art project using them.

I personally attempted to make a stamp out of a potato with my initials on it so I could label my books with my initials.

I cut a potato with a knife (students could use toothpicks) and made an intricate AS.


Then I went to stamp something. Umm... forgot that part about it needing to be the other way around to show up as a stamp.  Instead I had this backward S followed by and A.

Oops. Time to start over.

I tried again, and this time made it the RIGHT way.

But when I stamped it on a book, it didn't really turn out as professional as I hoped.


So I started playing with the rest of the potato and making different shapes that students could make.

Such as a smiley face:

And a heart:


 This would be a cool project to do on a fabric material and I think it would turn out best that way.  The potatoes also serve as perfect large stamps for little hands.

Enjoy,

Amy