
Monday, September 17, 2012
Day 50: Parking Lot Sight Word Game
For Day 50, we were supposed to be a minimalist and create something using white materials. I was a huge minimalist and only used one material... posterboard!! I created a parking lot game, from jugglingwithkids (picture from jugglingwithkids). I just took white posterboard, drew parking spots on it, and had it laminated. Now I can write sight words in the parking spots and students drive their toy cars to those spots. They absolutely love it!!
Day 49: UCF Wreath
On day 49, we were supposed to work with quantity over quality, or work with a lot of something. I chose to work with a lot of scraps of fabric to make this rag wreath themed around my college, UCF. This could work for any theme or any school, and I think I might eventually make one for my new Elementary School.
I made Gator wreaths for Christmas last year, and they turned out great!

I made Gator wreaths for Christmas last year, and they turned out great!
Day 48: Jack and the Beanstalk Word Wall
 On day 48, we were supposed to make something tall. I made a word wall for my classroom that is 'Jack and the Beanstalk' themed. I got the idea off of my travels through pinterest. I just took a long piece of green butcher paper and crumpled it up. Then I stapled it to the wall. I cut out a big cloud to put on the top, and the words say, "Grow with Words". I then used a die-cut machine to cut out 26 leafs, and added a letter to each leaf. As we go along and learn new words, we add the words to the letter they belong to. Perfect for my fairy tale classroom!
Day 47: Musical Flowers in a Number 2 Pencil Vase
Today I was supposed to work with flowers - artifical, real, etc. I decided to make my own flowers like the ones I made on my musical wreath last year.

I put them in my number two pencil vase, perfect for a classroom!


To make these, you simply cut out a circle from a piece of paper, cut a spiral in the paper, roll up, and hot glue.
I put them in my number two pencil vase, perfect for a classroom!

Saturday, August 4, 2012
Day 46: Face Challenge
On day 46 we were supposed to do something with a face.
I had NO idea what to do, so I went to summer camp, got out paints, pipe cleaners, gems, markers, and ketchup (!) and explained the rules.
I broke the kids into groups and had them elect a group leader. Then then had to talk in their groups for 5 minutes about how they were going to use the materials to decorate their group leader's face.
They were not allowed to cover the eye area. I really didn't give many rules and was expecting mass chaos, but it wasn't too bad! It was nice to see them use their creativity in fun ways.
Here are some pictures of the process:


And here were some of the results:


The kids were having so much fun that the 'adults' had to join in on the action, too:


Day 45: Crayon Melting Project
On day 45, I was supposed to create an image with tape.
Boy, was this a big project!!!
I collaborated a few pinterest ideas together for this one. One from Craftzine where you take an old thrift store painting, tape letters on it, then paint over it. I also used the idea that's all over pinterest where you melt crayons to make art, from 52 Kitchen Adventures.
I will have to go through this one step by step. It was long, tedious, and messy.
I started with this canvas painting that I found on clearance at Michael's about a year ago for $6. I've been waiting to tackle a project I could use it for.

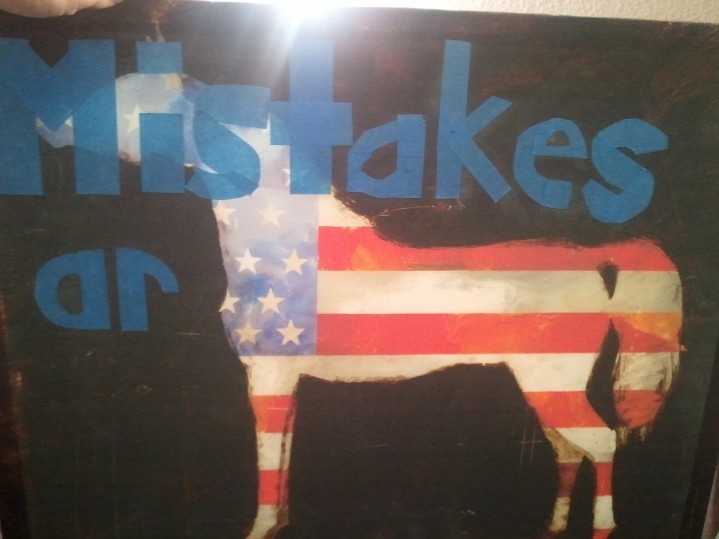
I decided on which quote I would want to put on the painting. I needed one that I could use in my classroom, and I decided on, "Mistakes are proof that you are trying."
I used painter's tape to start making the letters. This was very time consuming and the letters weren't coming out as perfect as I would like, so it was time to re-think my strategy.

I ended up sticking a bunch of tape on a piece of wax paper, writing the bubble letters on the tape, cutting them out, peeling off the back, and sticking them on. SO much easier, and SO much prettier!


Originally, I was going to just spray paint over the letters once I stuck them on there, but at the last minute I was inspired to do the melting crayon thing. I tried a few different versions. First, I used an old hot glue gun and put the crayons in there. This was very time consuming, so once again I had to re-think my plan. I didn't have room above where it says, 'Mistakes' to put the row of crayons vertically, so I only put a few crayons horizontally across the top. I then used a hair dryer to melt the crayons completely away and push the wax down to the paper. This was very messy and took FOREVER.

When I was finished, I peeled off the tape. The tape actually did a pretty good job of keeping the shape of the letters, but I felt like you couldn't see the letters very well because the background wasn't all the same color and it all mixed in with the colors of the crayons. This would have been much better on a white canvas, solid colored, or if I had painted it before.
So, once again, I had to re-think my plan. I went back to the glue gun, inserted a white crayon in there, and started pumping away again. I filled in all the letters. I also made them drip a little to look more like mistakes. Again, this took forever. And, as you can see it took awhile for the red to phase out and the wax to be completely white, so some of the letters were pink.

Overall, I am glad I finished the project and didn't give up, but I also think I could make it better next time. I'm glad I finally tried out that crayon melting thing.
Look at the mess!!!

Boy, was this a big project!!!
I collaborated a few pinterest ideas together for this one. One from Craftzine where you take an old thrift store painting, tape letters on it, then paint over it. I also used the idea that's all over pinterest where you melt crayons to make art, from 52 Kitchen Adventures.
I will have to go through this one step by step. It was long, tedious, and messy.
I started with this canvas painting that I found on clearance at Michael's about a year ago for $6. I've been waiting to tackle a project I could use it for.

I decided on which quote I would want to put on the painting. I needed one that I could use in my classroom, and I decided on, "Mistakes are proof that you are trying."
I used painter's tape to start making the letters. This was very time consuming and the letters weren't coming out as perfect as I would like, so it was time to re-think my strategy.
I ended up sticking a bunch of tape on a piece of wax paper, writing the bubble letters on the tape, cutting them out, peeling off the back, and sticking them on. SO much easier, and SO much prettier!


Originally, I was going to just spray paint over the letters once I stuck them on there, but at the last minute I was inspired to do the melting crayon thing. I tried a few different versions. First, I used an old hot glue gun and put the crayons in there. This was very time consuming, so once again I had to re-think my plan. I didn't have room above where it says, 'Mistakes' to put the row of crayons vertically, so I only put a few crayons horizontally across the top. I then used a hair dryer to melt the crayons completely away and push the wax down to the paper. This was very messy and took FOREVER.

When I was finished, I peeled off the tape. The tape actually did a pretty good job of keeping the shape of the letters, but I felt like you couldn't see the letters very well because the background wasn't all the same color and it all mixed in with the colors of the crayons. This would have been much better on a white canvas, solid colored, or if I had painted it before.
So, once again, I had to re-think my plan. I went back to the glue gun, inserted a white crayon in there, and started pumping away again. I filled in all the letters. I also made them drip a little to look more like mistakes. Again, this took forever. And, as you can see it took awhile for the red to phase out and the wax to be completely white, so some of the letters were pink.

Overall, I am glad I finished the project and didn't give up, but I also think I could make it better next time. I'm glad I finally tried out that crayon melting thing.
Look at the mess!!!

Day 44: Inspirational Lamp
On day 44, we were supposed to make something that lights up. I worked with a mini lamp that I got at goodwill and cleaned up a little.
I got this idea from pinterest a looong time ago... it's from A Little Glass Box. You just take a boring white lampshade, and write on it with sharpie.
I wrote some Dr. Seuss quotes on this lamp in cursive (I know the younger ones won't be able to read it, but I can tell them what it says if they ask) and put it over at my listening center.
 The quotes I used were from Dr. Seuss' I Can Read with my Eyes Shut! and they were: "The more that you read, the more things you will know. The more that you learn, the more places you'll go... You'll miss the best things if you keep your eyes shut."
.jpg) It adds a nice little homey touch to my classroom!
It adds a nice little homey touch to my classroom!
I got this idea from pinterest a looong time ago... it's from A Little Glass Box. You just take a boring white lampshade, and write on it with sharpie.
I wrote some Dr. Seuss quotes on this lamp in cursive (I know the younger ones won't be able to read it, but I can tell them what it says if they ask) and put it over at my listening center.

.jpg)
Subscribe to:
Posts (Atom)